Introduction
Couples of home learning courses come with a great many cassette tapes of audible lessons. Constant winding and re-winding the tapes to find the fragment as needed turns out to be really annoying. So, all you need is to get those inconvenient cassette tapes onto your computer! Just record the tapes with Free Sound Recorder to make your study easier. Let’s see How to Record Home Learning Courses in details.
Step 1. Connect Cassette Player to the PC
Launch Free Sound Recorder. Connect your cassette player to the computer through Line-In or Aux input and play it. You can go to our tutorial page of how to connect various devices including cassette player to the computer for more info.
Step 2. Choose Sound Source and Sound Card
Click “Show mixer window” button to choose “Mic Volume” from the “Recording Mixer” dropdown list. Then, select proper recording device from “Recording Device” dropdown menu. Adjust the volume and balance.

Step 3. Adjust Recording Settings
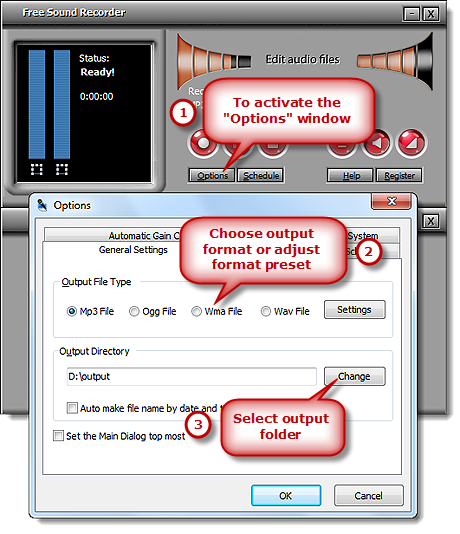
Click “Options” to activate “Options” window. In “General Settings” area, you can specify an output format among MP3, WAV, WMA and OGG. Click “Settings” to use the well-configured presets or specify the configuration parameters to adjust the recording quality. Click “Change” to select an output folder. It also has the ability to auto-name the recorded file by date and time.

Step 4. Start Recording
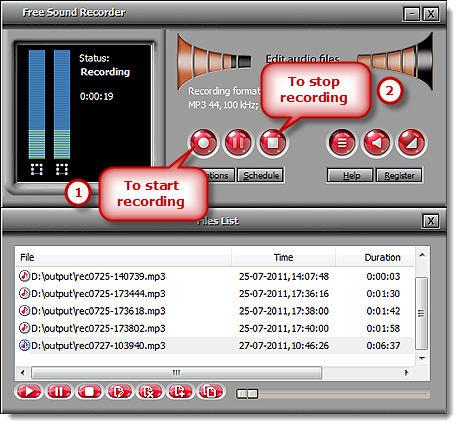
Click “Start recording” to start. Click “Stop recording” to stop. The recorded sound will be directly output to the output folder & listed in the file list with detailed information like filename, location, time and duration. You can play the recording with the built-in player.

